At the beginning of 2023, I undertook the study and making of enameled jewelry. Enameled jewelry is created by firing glass on to a metal base, such as pure copper, fine silver (not sterling), or gold, using either a torch or a kiln. Forms of art that you may know that use enamel are cloisonne’, plique-a-jour, sgraffito, and many more (of which I have not heard). Enamels come in a variety of forms: unleaded powder (which I use), leaded powder, liquid, and a few others. For any of them, the variety of colors are amazing.
It has been an intense learning experience. Initially, between YouTube and books, I learned quite a lot. And, added in a private class in enameling in Seattle at Danaca Designs, which was invaluable. Experience is essential. I continue to experiment with the processes and look for interesting methods of creating designs. At first, I had thought that I’d do my enameling using a torch but then decided that quality is more consistent using a kiln. So, I bought a kiln.
THE PROCESS:
The process of making enameled jewelry is an investment, requiring various pieces of “enamel dedicated” equipment. I thought I’d share with you the highlights of how the process goes for me while working. Here are the 5 main components:
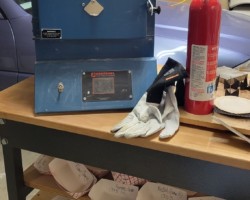
1. Safety Equipment: since we are working with powered enamel, an N95 mask or respirator is required to keep the fine glass particles out of your lungs. Special goggles are needed to protect the eyes against the infra-red rays put off by the kiln (to avoid cataracts) and the fireproof glove is worn to prevent you from getting burned as you place your piece into the kiln (which is typically at 1450 degrees (F)). A fire extinguisher is a must!
2. Cleaning your metalwork: this is THE MOST important step of the process. If your metal is not clean of oils, dirt, and fire scale, you enamel is not going to melt onto the metal. Cleaning can take 10-20 minutes depending on which method you need to use to get things squeaky clean. There is pickling in a hot crockpot of vinegar for 15 minutes or scrubbing the piece with Bon Ami. Sometimes, it requires both.
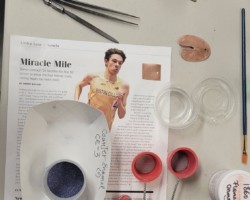
3. Design: Your design can include variety of colors of enamels on one or multiple pieces as well as decals, stencils, and other glazes. To begin, sift the powdered enamel onto your metal to which a binder has been applied to help keep the powder in place.
4. Staging/work area before firing: this consists of a fireproof tile with metal trivets on which to place your pieces to be fired. In the photo, I’ve put a simple square that has a dark blue enamel sifted on to it. Then, confirm that the temperature is at the desired level.
5. Finally, one must put on the goggles and glove before picking up the trivet (that is resting on wire mesh) with a spatula and load it into the kiln. A steady hand is required so as to not spill the enamel off the metal onto the bottom of the kiln. Then, after two minutes, you again put on your goggles and glove and lift your fired piece out of the kiln. Voila!


Below are earrings and necklaces I’ve made. If there is a piece of interest, I can send you additional info and/or photos. In addition. If you like a style but would like different colors, I can work with you on that. As you will see below, there is quite the variety of colors available. Please email me with your inquiries to: coralyn@cwwhitneydesign.com


